ViewGroupによるタッチイベントの管理
ViewGroupにおけるタッチイベントの管理
onInterceptTouchEvent()メソッドをオーバーライドすることで、サブビューに対して、タッチイベントを発生させないようにすることができる。
class MyViewGroup @JvmOverloads constructor(
        context: Context,
        private val mTouchSlop: Int = ViewConfiguration.get(context).scaledTouchSlop
) : ViewGroup(context) {

    override fun onInterceptTouchEvent(ev: MotionEvent): Boolean {
        if (mIsScrolling) {
            // サブビューに対してタッチイベントが発生させないようにし、自身のタッチイベントが発生するようにする。
            return true
        } else {
            // サブビュー側のタッチイベントが呼び出される
            return false
        }
    }
サブビューは、ViewGroupのrequestDisallowInterceptTouchEvent(boolean)メソッドを通じて、横取りしないように要求することもできる。
参照
複数ポインタのトラッキング
複数のポインタをトラックする
ACTION_DONWこのポインタのindexは必ず0が割り当てられるACTION_POINTER_DOWNindexが0以外のポインタがスクリーン上で検知された場合、呼び出される。割り当てられるindexは、getActionIndex()メソッドから取得が可能ACTION_POINTER_UPポインタが離れた場合、呼び出されるACTION_UP最後のポインタがスクリーンを離れた場合、呼び出される
indexとIDを通して、個々のポインターをトラックする
- index 各ポインター情報は配列としてストアされている。
MotionEventで用意されている多くのメソッドは、このindex値を引き受ける - ID 各ポインタは、タッチイベントを通じて変わらないIDが割り当てられている
格納されるポインタの順序(index)は未定義であるが、IDは変わらない。
該当するポインタのindexが取得したい場合は、findPointerIndex(ID)メソッドを使うことができる。
// ポインタIDの保存。indexが0のポインタは、ACTION_DOWNイベントを発生させたポインタであることが保証されている
mActivePointerId = event.getPointerId(0)

val (x: Float, y: Float) = event.findPointerIndex(mActionPointerId).let {
    event.getX(pointerIndex) to event.getY(pointerIndex)
}
MotionEvent その他のパラメーター
history情報
前回のタッチポイントを取得することができる
val prevX = event.getHistoricalX(0, event.historySize - 1)
event.historySizeACTION_MOVEの時のみ有効。それ以外のアクション時は常に0が返されるgetHistoricalX(pointerIndex, position)過去のタッチイベント情報の取得
MotionEvent.action vs MotionEvent.actionMasked
両方ともint値が返されるが、MotionEvent.actionの方には、ID値も添付される。
単純にアクションの判定を行う場合は、MotionEvent.actionMaskedの方を使用する。
when(event.actionMasked) {
    MotionEvent.ACTION_DOWN -> { // このポインタのindexは必ず0が割り当てられる
    MotionEvent.ACTION_POINTER_DOWN -> {
    MotionEvent.ACTION_MOVE -> { ..
    MotionEvent.ACTION_POINTER_UP -> { ..
    MotionEvent.ACTION_UP -> { ..
}
タッチポイントの領域情報
タッチポイントの領域は、楕円で取得することができるので、その向き(orientation)を判定することができる
getToolMajor(pointerIndex)楕円の長い方の長さ(float)getToolMinor(pointerIndex)楕円の短い方の長さ(float)getOrientation(pointerIndex)時計回りに楕円の向きを表す。0 radiansは、12時。-PI/2(指の場合は左側を向いている)からPI/2(指の場合は、右側を向いている)で表される。
参照
GestureDetectorを使ったジェスチャーのハンドリング
概要
GestureDetectorを使うことで、共通のジェスチャーを簡単にハンドルすることができる。
またActivity.onTouchEvent()もしくはView.onTouchEvent()と組み合わせて使うため、それ以外のジェスチャーのハンドリングもシンプルに記述することが可能となっている。
ハンドルできるジェスチャー
- シングルタップ
- ダブルタップ
- フリック
- スクロール - フリックの途中も呼び出されるため、フリックとの組み合わせは注意が必要
使い方
- インスタンスの生成とタッチイベントのハンドリング
GestureDetector.OnGestureListenerの実装- ダブルタップをサポートする場合は、
GestureDetector.OnDoubleTapListenerを実装
1. インスタンスの生成とハンドリング
タッチイベントをハンドリングするために、GestureDetectorの上位互換であるGestureDetectorCompatインスタンスを生成し、Activity.onTouchEvent() もしくは、View.onTouchEvent()でハンドリングする。
class MainActivity : AppCompatActivity(), GestureDetector.OnGestureListener, GestureDetector.OnDoubleTapListener {

    lateinit var gestureDetector: GestureDetectorCompat

    override fun onCreate(savedInstanceState: Bundle?) {
        super.onCreate(savedInstanceState)
        setContentView(R.layout.activity_main)

        gestureDetector = GestureDetectorCompat(this, this)
        gestureDetector.setOnDoubleTapListener(this)
    }
GestureDetectorCompat(context, listener)gestureDetector.setOnDoubleTapListener(this)ダブルタップを有効にする場合
override fun onTouchEvent(event: MotionEvent?): Boolean {
    // GestureDetector側でハンドリングされた場合は、trueが返される
    if (gestureDetector.onTouchEvent(event)) {
        return true
    } else {
    // GestureDetector側でハンドリングされなかった場合は、それ以外のタッチジェスチャーがこちらでハンドリングできる
        return super.onTouchEvent(event)
    }
}
2. GestureDetector.OnGestureListenerの実装
以下のメソッドを全てオーバーライドする必要がある
//region GestureDetector.OnGestureListener

// MothionEvent.DONWのハンドリング
override fun onDown(e: MotionEvent): Boolean {
    Log.d(DEBUG_TAG, "onDown: $e")
    return true
}

override fun onShowPress(e: MotionEvent) {
    Log.d(DEBUG_TAG, "onShowPress: $e")
}

override fun onSingleTapUp(e: MotionEvent): Boolean {
    Log.d(DEBUG_TAG, "onSingleTapUp: $e")
    return true
}

override fun onLongPress(e: MotionEvent) {
    Log.d(DEBUG_TAG, "onLongPress: $e")
}

override fun onFling(
    e1: MotionEvent,
    e2: MotionEvent,
    velocityX: Float,
    velocityY: Float
): Boolean {
    Log.d(DEBUG_TAG, "onFling: $e1 $e2")
    return true
}

override fun onScroll(
    e1: MotionEvent,
    e2: MotionEvent,
    distanceX: Float,
    distanceY: Float
): Boolean {
    Log.d(DEBUG_TAG, "onScroll: $e1 $e2")
    return true
}

//endregion
ダブルタップの検知もサポートする場合
GestureDetector.OnDoubleTapListenerを実装する
以下のメソッドをオーバーライドする
//region GestureDetector.OnDoubleTapListener

override fun onSingleTapConfirmed(e: MotionEvent): Boolean {
    Log.d(DEBUG_TAG, "onSingleTapConfirmed: $e")
    return true
}

override fun onDoubleTap(e: MotionEvent): Boolean {
    Log.d(DEBUG_TAG, "onDoubleTap: $e")
    return true
}

override fun onDoubleTapEvent(e: MotionEvent): Boolean {
    Log.d(DEBUG_TAG, "onDoubleTapEvent: $e")
    return true
}

//endregion
イベントのハンドリング
シングルタップ
onDown: MotionEvent { action=ACTION_DOWN, actionButton=0, id[0]=0, x[0]=563.9612, y[0]=1256.9531, toolType[0]=TOOL_TYPE_FINGER, buttonState=0, classification=NONE, metaState=0, flags=0x0, edgeFlags=0x0, pointerCount=1, historySize=0, eventTime=135467577, downTime=135467577, deviceId=11, source=0x1002, displayId=0 }

--- onDownされたのでactivity or viewに結果をtrueで返す

onShowPress: MotionEvent { action=ACTION_DOWN, actionButton=0, id[0]=0, x[0]=563.9612, y[0]=1256.9531, toolType[0]=TOOL_TYPE_FINGER, buttonState=0, classification=NONE, metaState=0, flags=0x0, edgeFlags=0x0, pointerCount=1, historySize=0, eventTime=135467577, downTime=135467577, deviceId=11, source=0x1002, displayId=0 }

onSingleTapUp: MotionEvent { action=ACTION_UP, actionButton=0, id[0]=0, x[0]=563.9612, y[0]=1256.9531, toolType[0]=TOOL_TYPE_FINGER, buttonState=0, classification=NONE, metaState=0, flags=0x0, edgeFlags=0x0, pointerCount=1, historySize=0, eventTime=135467700, downTime=135467577, deviceId=11, source=0x1002, displayId=0 }

--- ダブルタップの可能性があるため一旦activity or viewにtrueが返る

最後にシングルタップの検知

onSingleTapConfirmed: MotionEvent { action=ACTION_DOWN, actionButton=0, id[0]=0, x[0]=563.9612, y[0]=1256.9531, toolType[0]=TOOL_TYPE_FINGER, buttonState=0, classification=NONE, metaState=0, flags=0x0, edgeFlags=0x0, pointerCount=1, historySize=0, eventTime=135467577, downTime=135467577, deviceId=11, source=0x1002, displayId=0 }
ダブルタップの検知
onDown: MotionEvent { action=ACTION_DOWN, actionButton=0, id[0]=0, x[0]=359.97803, y[0]=841.9336, toolType[0]=TOOL_TYPE_FINGER, buttonState=0, classification=NONE, metaState=0, flags=0x0, edgeFlags=0x0, pointerCount=1, historySize=0, eventTime=136774823, downTime=136774823, deviceId=11, source=0x1002, displayId=0 }

--- onDownの結果が返る

onSingleTapUp: MotionEvent { action=ACTION_UP, actionButton=0, id[0]=0, x[0]=359.97803, y[0]=843.9258, toolType[0]=TOOL_TYPE_FINGER, buttonState=0, classification=NONE, metaState=0, flags=0x0, edgeFlags=0x0, pointerCount=1, historySize=0, eventTime=136774912, downTime=136774823, deviceId=11, source=0x1002, displayId=0 }

--- onSingleToupの結果が返る

onDoubleTap: MotionEvent { action=ACTION_DOWN, actionButton=0, id[0]=0, x[0]=359.97803, y[0]=841.9336, toolType[0]=TOOL_TYPE_FINGER, buttonState=0, classification=NONE, metaState=0, flags=0x0, edgeFlags=0x0, pointerCount=1, historySize=0, eventTime=136774823, downTime=136774823, deviceId=11, source=0x1002, displayId=0 }

onDoubleTapEvent: MotionEvent { action=ACTION_DOWN, actionButton=0, id[0]=0, x[0]=359.97803, y[0]=843.9258, toolType[0]=TOOL_TYPE_FINGER, buttonState=0, classification=NONE, metaState=0, flags=0x0, edgeFlags=0x0, pointerCount=1, historySize=0, eventTime=136774991, downTime=136774991, deviceId=11, source=0x1002, displayId=0 }

onDown: MotionEvent { action=ACTION_DOWN, actionButton=0, id[0]=0, x[0]=359.97803, y[0]=843.9258, toolType[0]=TOOL_TYPE_FINGER, buttonState=0, classification=NONE, metaState=0, flags=0x0, edgeFlags=0x0, pointerCount=1, historySize=0, eventTime=136774991, downTime=136774991, deviceId=11, source=0x1002, displayId=0 }

--- onDownの結果が返る

onDoubleTapEvent: MotionEvent { action=ACTION_UP, actionButton=0, id[0]=0, x[0]=359.97803, y[0]=843.9258, toolType[0]=TOOL_TYPE_FINGER, buttonState=0, classification=NONE, metaState=0, flags=0x0, edgeFlags=0x0, pointerCount=1, historySize=0, eventTime=136775082, downTime=136774991, deviceId=11, source=0x1002, displayId=0 }

--- onDoubleTapEvent action=ACTION_UPの結果が返る
onDoubleTapEvent()が、開始ACTION_DOWNと最後ACTION_UPの2回呼ばれるonSingleTap()が呼ばれているが、onSingleTapConfirmed()は呼ばれていない
フリック
onDown: MotionEvent { action=ACTION_DOWN, actionButton=0, id[0]=0, x[0]=585.9778, y[0]=1256.9531, toolType[0]=TOOL_TYPE_FINGER, buttonState=0, classification=NONE, metaState=0, flags=0x0, edgeFlags=0x0, pointerCount=1, historySize=0, eventTime=135656229, downTime=135656229, deviceId=11, source=0x1002, displayId=0 }

--- onDonwの結果が返される

onScroll: MotionEvent { action=ACTION_DOWN, actionButton=0, id[0]=0, x[0]=585.9778, y[0]=1256.9531, toolType[0]=TOOL_TYPE_FINGER, buttonState=0, classification=NONE, metaState=0, flags=0x0, edgeFlags=0x0, pointerCount=1, historySize=0, eventTime=135656229, downTime=135656229, deviceId=11, source=0x1002, displayId=0 } MotionEvent { action=ACTION_MOVE, actionButton=0, id[0]=0, x[0]=585.9778, y[0]=1228.0225, toolType[0]=TOOL_TYPE_FINGER, buttonState=0, classification=NONE, metaState=0, flags=0x0, edgeFlags=0x0, pointerCount=1, historySize=2, eventTime=135656277, downTime=135656229, deviceId=11, source=0x1002, displayId=0 }

--- onScrollの結果が返される

onScroll: MotionEvent { action=ACTION_DOWN, actionButton=0, id[0]=0, x[0]=585.9778, y[0]=1256.9531, toolType[0]=TOOL_TYPE_FINGER, buttonState=0, classification=NONE, metaState=0, flags=0x0, edgeFlags=0x0, pointerCount=1, historySize=0, eventTime=135656229, downTime=135656229, deviceId=11, source=0x1002, displayId=0 } MotionEvent { action=ACTION_MOVE, actionButton=0, id[0]=0, x[0]=585.9778, y[0]=1189.4066, toolType[0]=TOOL_TYPE_FINGER, buttonState=0, classification=NONE, metaState=0, flags=0x0, edgeFlags=0x0, pointerCount=1, historySize=1, eventTime=135656294, downTime=135656229, deviceId=11, source=0x1002, displayId=0 }

--- onScrollの結果が返される

onScroll: MotionEvent { action=ACTION_DOWN, actionButton=0, id[0]=0, x[0]=585.9778, y[0]=1256.9531, toolType[0]=TOOL_TYPE_FINGER, buttonState=0, classification=NONE, metaState=0, flags=0x0, edgeFlags=0x0, pointerCount=1, historySize=0, eventTime=135656229, downTime=135656229, deviceId=11, source=0x1002, displayId=0 } MotionEvent { action=ACTION_MOVE, actionButton=0, id[0]=0, x[0]=585.9778, y[0]=1154.9127, toolType[0]=TOOL_TYPE_FINGER, buttonState=0, classification=NONE, metaState=0, flags=0x0, edgeFlags=0x0, pointerCount=1, historySize=2, eventTime=135656310, downTime=135656229, deviceId=11, source=0x1002, displayId=0 }

--- onScrollの結果が返される

... onScrollが何度か呼び出される

--- onScrollの結果が返される

onFling: MotionEvent { action=ACTION_DOWN, actionButton=0, id[0]=0, x[0]=585.9778, y[0]=1256.9531, toolType[0]=TOOL_TYPE_FINGER, buttonState=0, classification=NONE, metaState=0, flags=0x0, edgeFlags=0x0, pointerCount=1, historySize=0, eventTime=135656229, downTime=135656229, deviceId=11, source=0x1002, displayId=0 } MotionEvent { action=ACTION_UP, actionButton=0, id[0]=0, x[0]=574.9695, y[0]=407.9297, toolType[0]=TOOL_TYPE_FINGER, buttonState=0, classification=NONE, metaState=0, flags=0x0, edgeFlags=0x0, pointerCount=1, historySize=0, eventTime=135656476, downTime=135656229, deviceId=11, source=0x1002, displayId=0 }
dle the touch event successfuly

--- onFlingの結果が返される
- フリックの途中の
onScroll(指の移動)が呼び出される
SimpleOnGestureListenerを使う方法
OnGestureListenrは使用しないジェスチャーもオーバーライドする必要があるが、SimpleOnGestureListenerを使用することで、
必要な分だけオーバーライドする事ができる。
ただしこちらはクラスなのでActivityやViewに直接実装することはできない。
フリックのハンドリングのみ実装できる
private class MyGestureListener : GestureDetector.SimpleOnGestureListener() {

    override fun onDown(event: MotionEvent): Boolean {
        Log.d(DEBUG_TAG, "onDown: $event")
        return true
    }

    override fun onFling(
            event1: MotionEvent,
            event2: MotionEvent,
            velocityX: Float,
            velocityY: Float
    ): Boolean {
        Log.d(DEBUG_TAG, "onFling: $event1 $event2")
        return true
    }
}
参照
View Binding
概要
View Bindingを使うことで、findViewById()を取り替えることができる。
Setup instruction
build.gradle
アプリ側のbuild.gradleにviewBindingをtrueにする
android {
    ...
    buildFeatures {
        viewBinding = true
    }
}
Layoutファイル側
ViewBindingが不要なLayoutファイルは、tools:viewBindingIgnore="true"を追加する。
<LinearLayout
        ...
        tools:viewBindingIgnore="true" >
    ...
</LinearLayout>
使い方
viewBindingが有効な場合は、レイアウトファイル(XML)ごとに、bindingクラスが自動生成され、各Viewはidを通してアクセスすることができる。
result_profile.xml
<LinearLayout ... >
    <TextView android:id="@+id/name" />
    <ImageView android:cropToPadding="true" />
    <Button android:id="@+id/button"
        android:background="@drawable/rounded_button" />
</LinearLayout>
Data binding ライブラリ サンプル
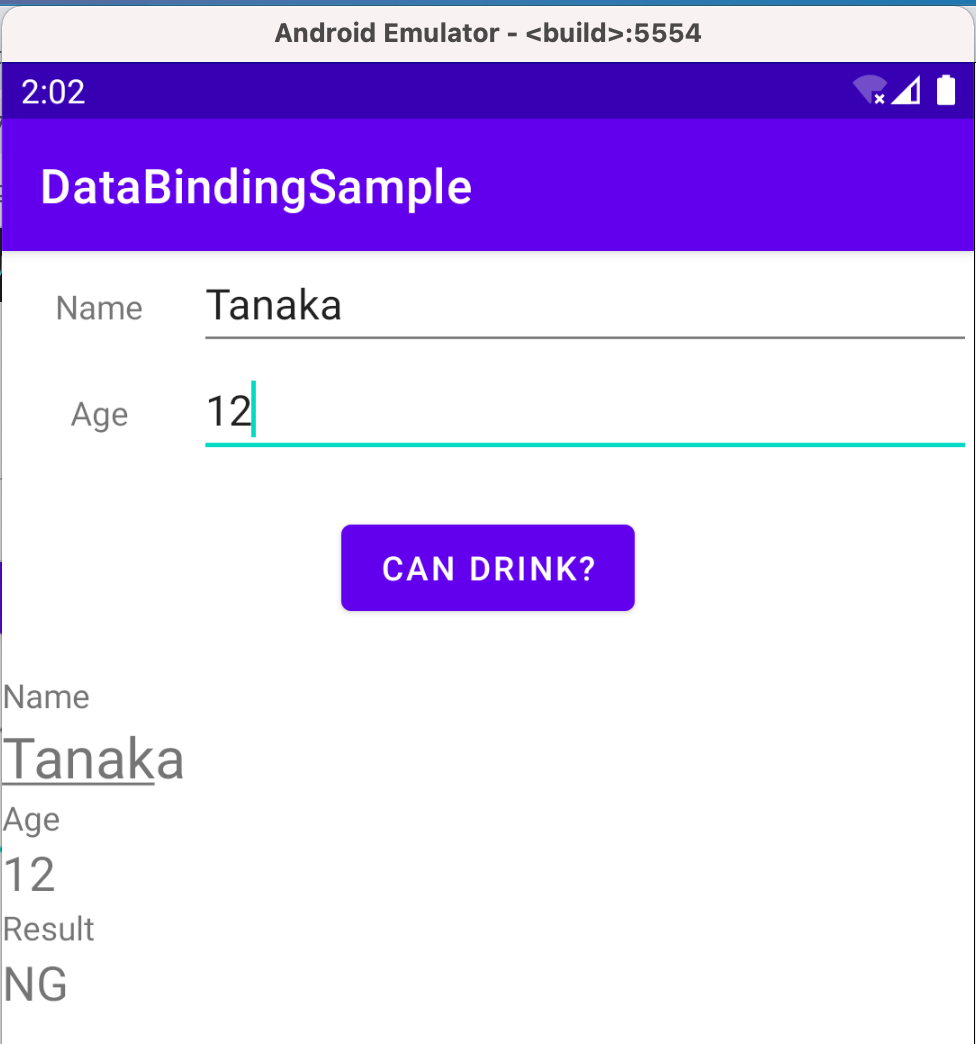
作ったサンプル
画面
Set up
Gradle
アプリ側のbuild.gradleに以下を記述
android {

buildFeatures {
        dataBinding true
    }
}
Layoutファイル
layoutタグをルートに変更する
activity_main.xml
<?xml version="1.0" encoding="utf-8"?>
<layout xmlns:android="http://schemas.android.com/apk/res/android"
    xmlns:app="http://schemas.android.com/apk/res-auto">
    <data>
        <variable
            name="resultHandler"
            type="io.github.yossan.databindingsample.MainActivity.ResultListener" />
    </data>
    <androidx.constraintlayout.widget.ConstraintLayout

....
ソースファイル側
layoutファイルに、Data bindingする必要がある。
MainActivity.kt
override fun onCreate(savedInstanceState: Bundle?) {
    super.onCreate(savedInstanceState)
    setContentView(R.layout.activity_main)

         // activity_main.xmlレイアウトファイルの場合
    DataBindingUtil.setContentView<ActivityMainBinding>(this, R.layout.activity_main)
}
- 生成されるDataBindingクラスは、レイアウトファイル名に基づく
サンプル
View Reference
viewのidを通して直接アクセスすることができる
activity_main.xml
<!-- 参照元 -->
<EditText  android:id="@+id/nameEditText"

<!-- 参照 -->
<TextView android:text="@{nameEditText.text}"
_はCamel Caseに変換されるname_edit_text→nameEditText
Event Handling
activity_main.xml
    <data>
        <variable
            name="resultHandler"
            type="io.github.yossan.databindingsample.MainActivity.ResultListener" />
    </data>
- resultHandler: 生成されるDataBindingクラスの属性となる
2つの方式でかける
- Method Reference
- Listener bindings
Method Reference
<Button
    android:onClick="@{resultHandler::onClick}"/>
Listener bindings
ラムダ式が使える
<Button
    android:onClick="@{(view) -> resultHandler.onClick(view)}"/>
MainActivity.kt
class MainActivity : AppCompatActivity() {
    override fun onCreate(savedInstanceState: Bundle?) {
        super.onCreate(savedInstanceState)
        setContentView(R.layout.activity_main)

        val binding = DataBindingUtil.setContentView<ActivityMainBinding>(this, R.layout.activity_main)
        // resultHandlerにリスナーをつなげる
        binding.resultHandler = ResultListener(binding)
    }

    class ResultListener(val binding: ActivityMainBinding) : View.OnClickListener {
        override fun onClick(v: View) {
            binding.resultTextView.text = when(binding.ageEditText.text.toString().toInt()) {
                in 0..20 -> "NG"
                in 21..130 ->"OK"
                else -> "It's not human."
            }
        }
    }
}
プログラム側からViewに反映させる
lifecycleOwner を設定する必要がある。
    override fun onCreate(savedInstanceState: Bundle?) {
        super.onCreate(savedInstanceState)
        setContentView(R.layout.activity_main)

        viewModel = ViewModelProvider(this, object : ViewModelProvider.NewInstanceFactory() {
            override fun <T : ViewModel?> create(modelClass: Class<T>): T {
                return MainViewModel() as T
            }
        }).get(MainViewModel::class.java)

        val binding = DataBindingUtil.setContentView<ActivityMainBinding>(this, R.layout.activity_main)

        // これがないとプログラミング側での変更がlayoutに反映されない
        binding.lifecycleOwner = this
        binding.viewModel = viewModel
    }
layout file
<?xml version="1.0" encoding="utf-8"?>
<layout xmlns:android="http://schemas.android.com/apk/res/android"
    xmlns:app="http://schemas.android.com/apk/res-auto"

    >
    <data>
        <import type="androidx.lifecycle.MutableLiveData" />
        <import type="io.github.yossan.drawsample.MainViewModel" />
        <import type="io.github.yossan.drawsample.DrawView" />
        <variable
            name="viewModel"
            type="MainViewModel" />
    </data>
<androidx.constraintlayout.widget.ConstraintLayout
    xmlns:tools="http://schemas.android.com/tools"
    xmlns:custom="http://schemas.android.com/apk/res/io.github.yossan.drawsample"
    android:layout_width="match_parent"
    android:layout_height="match_parent"
    tools:context=".MainActivity">

    <io.github.yossan.drawsample.DrawView
        android:id="@+id/draw_view"
        android:layout_width="0dp"
        android:layout_height="0dp"
        custom:mode="@{viewModel.mode}"
        app:layout_constraintBottom_toTopOf="@+id/toolbar"
        app:layout_constraintEnd_toEndOf="parent"
        app:layout_constraintHorizontal_bias="0.0"
        app:layout_constraintStart_toStartOf="parent"
        app:layout_constraintTop_toTopOf="parent"
        app:layout_constraintVertical_bias="1.0" />

    <androidx.appcompat.widget.Toolbar
        android:id="@+id/toolbar"
        android:layout_width="match_parent"
        android:layout_height="wrap_content"
        android:background="?attr/colorPrimary"
        android:minHeight="?attr/actionBarSize"
        android:theme="?attr/actionBarTheme"
        app:layout_constraintBottom_toBottomOf="parent"
        app:layout_constraintEnd_toEndOf="parent"
        app:layout_constraintStart_toStartOf="parent">

        <Button
            android:id="@+id/pen"
            android:layout_width="wrap_content"
            android:layout_height="wrap_content"
            android:enabled="@{viewModel.mode == DrawView.Mode.pen ? false : true}"
            android:onClick="@{_ -> viewModel.toggleMode()}"
            android:text="@string/pen"
            />

        <Button
            android:id="@+id/eraser"
            android:layout_width="wrap_content"
            android:layout_height="wrap_content"
            android:enabled="@{viewModel.mode == DrawView.Mode.eraser ? false : true}"
            android:onClick="@{_ -> viewModel.toggleMode()}"
            android:text="@string/eraser" />
    </androidx.appcompat.widget.Toolbar>
</androidx.constraintlayout.widget.ConstraintLayout>
</layout>
Httpクライアント
Httpクライアント
Androidで主に利用されているHttpクライアント
特徴
| クライアント | 特徴 |
|---|---|
| HttpsURLConnection | Androidの標準ライブラリ |
| Volley | Googleが作成し、Android公式にドキュメントも用意されている |
| OkHttp | OSSのサードパーティ製 |
| Retrofit | OkHttpのラッパー。最近はこちらが人気 |
参照
Androidの通信ライブラリの歴史を振り返る - Qiita
ラムダ式
関数リテラルの一つ 他には、匿名関数が存在する。
構文
{ param1: Type1, ... ->
    // 本体
    式1
    式2
}
- パラメーター宣言部:
->の左側部分 - 本体:
->以降 - 返り値: 本体の最後の式の結果, voidの場合は、Unitが返り値となる
パラメーターの省略
パラメーターが存在しない場合は、パラメーター宣言部を省略できる
{ println("Hello World") }
トレーリングラムダ
関数のパラメーターの最後が関数リテラルを受け取れる場合は、()外に、ラムダ式を出すことができる
val product = items.fold(1) { acc, e -> acc * e }
it
暗黙のシングルパラメーター名。
パラメーターが一つの場合は、パラメーター宣言を省略して、itを使用することができる
ints.filter { it > 0 }
パラメーターの分割代入
Pair型は、分割代入することができる
map.mapValues { (key, value) -> "$key: $value" }
参照
関数リテラルの特徴について